To set up an Amazon Seller account, go to sell.amazon.com, create or sign in to your account, choose your seller plan, submit your business and tax details, upload valid identification, and complete Amazon’s verification process.
More than 60% of sales on Amazon come from third-party sellers, which shows how many businesses rely on the platform to grow online. Whether you are starting a side income or building a full ecommerce business, Amazon gives you access to a large global customer base.
The setup process is straightforward if your documents are ready. You will need a valid ID, a bank account, a chargeable card, and correct tax information. Most sellers can complete registration in a short time, but account verification usually takes around 2 to 3 business days and can extend longer depending on document accuracy and additional checks
Many new sellers face delays because of mismatched details, unclear documents, or incorrect account setup. This is where working with professional Amazon seller account setup services can help avoid common issues and speed up approval.
As a full-service Amazon agency, StarterX has built and scaled multiple Amazon stores across different models. Based on real account setup experience, we know how to structure your details, prepare documents correctly, and complete the process in a way that reduces delays and avoids common verification problems.
This guide walks you through the full process step by step, so you can set up your account correctly and start selling without unnecessary issues.
Key Takeaways:
- You can create an Amazon Seller account at sell.amazon.com by submitting your details and completing identity verification.
- Choose the right plan based on your goals: Individual for basic selling or Professional for full access to tools and scaling features.
- Your ID, bank account, credit card, and tax details must match exactly to avoid delays.
- Verification usually takes a few days, but it can take longer if documents are incorrect or require additional checks.
- Amazon allows only one seller account per person or business, and setup mistakes can lead to rejection or suspension.
- After approval, you must set up shipping, tax settings, and your first product listing before selling.
- Amazon pays on a 14-day cycle, but new sellers may face temporary payment holds.
- A clean and accurate setup helps you avoid issues and build a stable Amazon business from the start.
What Do You Need to Create an Amazon Seller Account?
To create an Amazon Seller account, you need a valid ID, a credit card, a bank account, tax information, and a phone number. All details must match the name and address on your documents.
Amazon uses this information to verify your identity, process payments, and confirm tax status. Incomplete or mismatched data often leads to registration delays or rejections.
Required Documents and Information Checklist
| Requirement | What It Must Include | Accepted Formats |
| Government-issued ID | Name, date of birth, clear photo | Passport, national ID, driver’s license |
| Bank account | Must be in your name or business name | Local or international bank accounts |
| Credit card | Must be chargeable for the identity check | Visa, MasterCard, Amex, etc. |
| Tax information | Country-specific tax ID or number | SSN, EIN (US); VAT (EU); PAN (India) |
| Phone number | Must support SMS or calls for 2-step verification | Mobile or landline |
| Business info | Legal name, business address (for registered businesses only) | Must match official registration |
Important Notes:
- All documents must be valid, unaltered, and clearly scanned in color.
- The name on your ID and bank account must match your Amazon registration exactly.
- Business sellers must also upload company registration documents (e.g., certificate of incorporation).
Tip: Use the same email and business details across all documents to avoid triggering Amazon’s fraud detection system.
Which Type of Amazon Seller Account Should You Choose?
You should choose a Professional account if you plan to sell more than 40 items per month or want access to business tools. Choose an Individual account if you’re selling occasionally and want to avoid monthly fees.
Amazon offers two main account types: Individual and Professional. Each is designed for different selling needs, and the right choice depends on your sales volume and goals.
Key Differences Between Individual and Professional Accounts
| Feature | Individual Account | Professional Account |
| Monthly Fee | None | $39.99 (USD) |
| Per-item Fee | $0.99 per item sold | No per-item fee |
| Product Listing Volume | Manual listing, one by one | Bulk upload tools are available |
| Buy Box Eligibility | Not eligible | Eligible |
| Access to Amazon Ads | No | Yes |
| Advanced Reports | No | Yes |
| Ideal For | Casual or new sellers | Brands, wholesalers, and high-volume sellers |
When Should You Choose a Professional Account?
Choose a Professional Seller account if:
- You sell more than 40 units/month
- You need inventory management or bulk listing tools
- You want to be eligible for the Buy Box
- You plan to use Amazon FBA or advertising features
- You operate as a registered business
When Should You Choose an Individual Account?
Choose an Individual Seller account if:
- You sell less than 40 units/month
- You want to test Amazon without monthly fees
- You don’t need access to ads or advanced reports
- You’re selling as a hobby or side project
Tip: You can upgrade from Individual to Professional anytime in Seller Central.
How to Register an Amazon Seller Account Step-by-Step?
To register an Amazon Seller account, go to sell.amazon.com, click “Sign up,” sign in or create a new Amazon account, then follow the seller onboarding process by submitting all required personal, business, tax, and banking information.
Amazon uses this process to verify your identity, approve your merchant profile, and grant access to Seller Central, where you can manage product listings, payments, and performance metrics.
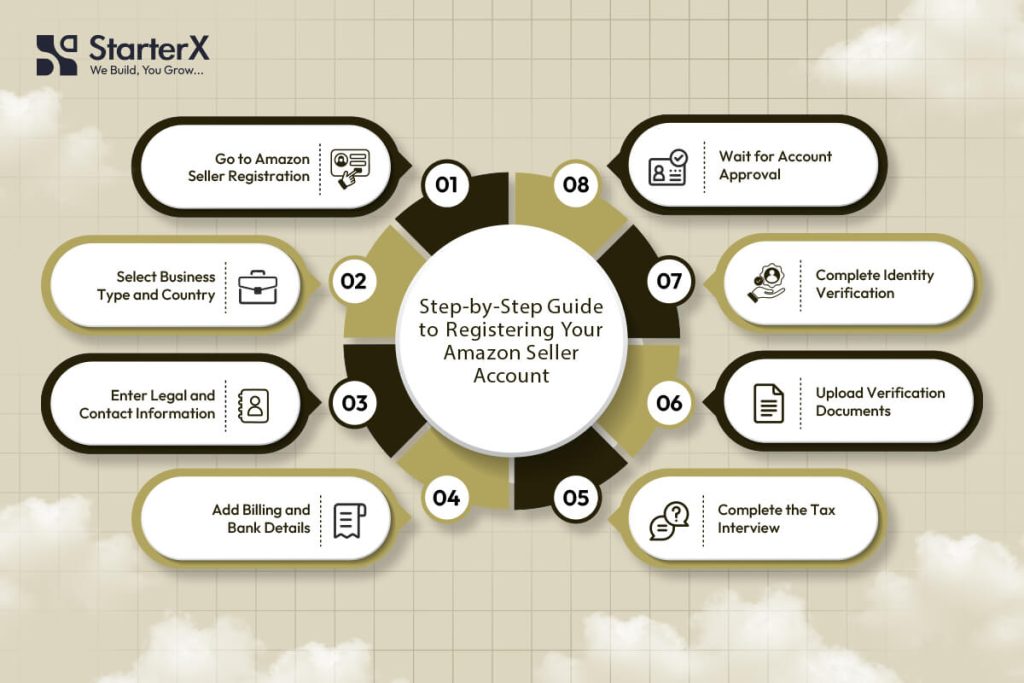
Step 1: Go to the Amazon Seller Registration Page
Visit sell.amazon.com and click “Sign up.” This redirects you to Amazon Seller Central, the platform where sellers manage inventory, pricing, fulfillment, and customer service.
You can either:
- Use your existing Amazon customer login, or
- Create a new business email account for selling purposes
Step 2: Select Business Type and Country
Choose your seller type. Options include:
- Individual (for casual or hobby sellers)
- Privately-owned business (LLC, sole proprietorship, corporation)
- Publicly-owned business
- Charity
- State-owned enterprise
Then, select the country where your business is legally registered. This determines your compliance requirements, available marketplaces, and tax regulations.
For many sellers, this step is where business structure decisions matter. If you plan to build a long-term Amazon business, setting up a proper legal structure like an LLC can help with liability protection, tax setup, and account stability. At the same time, some sellers prefer to start selling on Amazon without an LLC and transition later as they grow.
Step 3: Enter Legal Business and Personal Details
Amazon collects data to verify both you and your business entity. You must provide:
- Legal name (exactly as on ID or tax documents)
- Business address (must match utility bill or bank statement)
- Phone number (for two-step authentication)
- Email address (for account and buyer communication)
- Date and place of birth (for verification checks)
Ensure all information matches exactly across documents. Any mismatch can delay account approval.
Step 4: Add Payment and Billing Information
Amazon requires a valid credit or debit card that supports international transactions. This card is used for:
- Monthly subscription fees (Professional plan)
- Verification charges
- Advertising costs (if enabled later)
You’ll also need to add a bank account for receiving payouts.
If your local bank is not supported, you can use global payment solutions like Payoneer or Wise.
Required attributes:
- Account holder name (must match your registration)
- Bank account number (IBAN or local format)
- SWIFT/BIC code for international transfers
Step 5: Complete the Tax Interview
You’ll be required to complete a tax interview inside Seller Central, which determines your tax obligations.
- U.S. sellers submit SSN or EIN (W-9 form)
- Non-U.S. sellers complete W-8BEN or W-8BEN-E
- EU sellers may need a valid VAT number
This step usually takes less than 10 minutes, but accuracy is critical.
Many sellers face issues here because they do not fully understand Amazon seller tax requirements, especially when dealing with different countries, reporting rules, and compliance obligations.
Step 6: Upload Verification Documents
Amazon will ask you to upload documents for identity and address verification.
You must submit:
Government-issued ID
- Must be valid, not expired, and clearly visible
- Submit front and back (if required)
Proof of address (bank statement or utility bill)
- Must show full name and matching address
- Must be issued within the last 90 days
All documents must be clear, in color, and unedited.
Step 7: Complete Identity Verification (Video Call)
Depending on your location, Amazon may require a video verification call.
During the call, Amazon may:
- Ask you to show your original ID
- Confirm your name and personal details
- Review your documents in real time
Make sure you have:
- A working camera device
- Original documents ready
- A quiet, well-lit environment
Step 8: Submit and Wait for Account Approval
Once all steps are completed, Amazon will review your application. Most seller accounts are approved within 24 to 72 hours, but delays can happen if there are document mismatches or verification issues.
You’ll receive:
- Approval confirmation with Seller Central access, or
- A request to submit additional documents
If rejected, Amazon usually allows you to correct and resubmit your information.
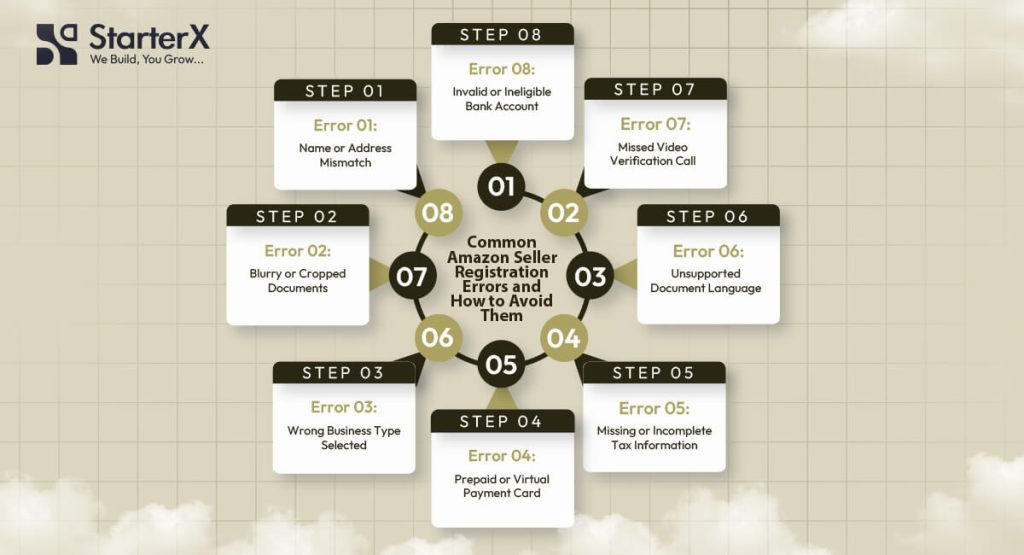
How to Avoid Common Registration Errors?
To avoid registration errors on Amazon, you must submit valid documents, ensure name and address consistency, select the correct business type, and follow Amazon’s ID verification guidelines exactly.
Most new sellers experience delays or rejections due to avoidable mistakes during the onboarding process. Amazon’s verification system is strict, and even minor mismatches can lead to account denial or long review times.
Below are the most common issues and how to avoid them.
1. Name or Address Mismatch Between Documents
Problem: Your legal name or address differs across your ID, bank statement, or registration form.
Why it matters: Amazon uses automated KYC checks. Any inconsistency between your uploaded documents and form entries triggers a manual review or rejection.
How to avoid it:
- Use your exact full legal name everywhere
- Avoid using abbreviations (e.g., “St.” vs. “Street”)
- Ensure your bank statement or utility bill has the same address as your Amazon profile
- If registering a business, use the registered company name exactly as it appears in your legal documents
2. Submitting Blurry or Incomplete Documents
Problem: You upload a low-resolution or cropped scan of your ID or proof of address.
Why it matters: Amazon’s system needs to read names, numbers, and expiration dates clearly for verification.
How to avoid it:
- Upload color scans in high resolution (300 DPI or higher)
- Ensure the entire document is visible, including all corners
- Use PDF, JPG, or PNG formats
- Do not mark or redact anything
Accepted documents: Passport, national ID card (front and back), utility bill, bank statement
3. Wrong Business Type Selection
Problem: You select the wrong entity type during registration.
Why it matters: If you register as a business but submit personal bank details or ID, your application may be flagged.
How to avoid it:
- If you run a registered company, select Business and submit official documents (certificate of incorporation, business license)
- If you’re an individual, select Individual and submit your personal ID and personal bank account
- Don’t switch types mid-process unless advised by Amazon
4. Using a Prepaid or Virtual Card
Problem: You add a payment method that Amazon cannot charge or validate.
Why it matters: Amazon tests your card during registration to validate your billing method.
How to avoid it:
- Use a real credit or debit card (Visa, Mastercard, Amex)
- The card must support international transactions
- It should not be prepaid, gift, or virtual-only
- The name on the card should match your Amazon account holder’s name
5. Missing or Incomplete Tax Information
Problem: You skip or incorrectly fill out the tax interview.
Why it matters: Tax compliance is mandatory. Incomplete or incorrect entries may pause the approval process.
How to avoid it:
- U.S. sellers must enter a valid SSN or EIN for the W-9
- Non-U.S. sellers must complete a W-8BEN or W-8BEN-E
- Use legal names and registered addresses exactly as they appear in government records
- Make sure your VAT or GST number is valid if registering in Europe, UK, or India
6. Document Language Not Supported
Problem: You upload ID or proof of address in a language Amazon does not support.
Why it matters: Amazon requires English or certified translations for all documents.
How to avoid it:
- Upload documents in English
- If not available, provide a certified translation
- Combine original + translation into one PDF if needed
7. Skipping Video Verification or Missing the Call
Problem: You ignore the identity verification call or miss your appointment.
Why it matters: Amazon may cancel your application if you don’t complete the live check.
How to avoid it:
- Be ready for a live video verification
- Use a laptop or phone with a working camera
- Have your original ID on hand
- Complete the call in a quiet, well-lit room
8. Using an Inactive or Ineligible Bank Account
Problem: Your payout account cannot receive payments or is under another name.
Why it matters: Amazon verifies payout accounts before disbursing funds.
How to avoid it:
- Use a personal or business bank account that matches the registration details
- Ensure the account supports incoming international transfers
- If local banking isn’t supported, use an Amazon-approved partner like Payoneer or Wise
What Countries Are Eligible to Sell on Amazon?
Amazon allows sellers from over 100 countries to register, provided they meet identity, banking, and tax compliance requirements. Eligibility depends on your country of residence, ability to receive payments, and access to required documents.
How to Check If Your Country Is Eligible
To verify if your country is supported by Amazon, visit the official help page here:
Amazon Global Selling – Country List
This list is updated regularly by Amazon and shows which countries can create seller accounts across Amazon marketplaces.
Core Requirements by Country
To be eligible, you must:
- Reside in an Amazon-approved country
- Have a valid government-issued ID
- Own a bank account that can receive international payments
- Provide a chargeable credit card
- Complete tax and identity verification in English or with a certified translation
- Accept Amazon’s seller terms and tax obligations per region
Examples of Eligible Countries
Here are some of the countries Amazon currently supports for seller registration:
| Region | Example Eligible Countries |
| North America | United States, Canada, Mexico |
| Europe | United Kingdom, Germany, France, Italy, Spain, Netherlands, Poland, Sweden |
| Asia-Pacific | India, Japan, Australia, Singapore, South Korea |
| Middle East | United Arab Emirates, Saudi Arabia |
| South America | Brazil |
| Africa | South Africa |
Note: Some regions may have access only to specific marketplaces (e.g. UAE sellers can only sell on Amazon.ae unless otherwise approved).
Common Limitations for Non-US Sellers
Even if your country is eligible, sellers outside the U.S. may face extra steps:
- You may need to open a global receiving account (e.g., Payoneer, Wise) if your local bank doesn’t support ACH or SEPA payments
- You must comply with local tax regulations like VAT, GST, or import-export laws
- Some countries require additional identity checks or notarized documentation
Countries That Are Not Eligible
Sellers from the following regions are currently not eligible to register:
- North Korea
- Iran
- Syria
- Sudan
- Crimea Region
- Any country under U.S. or UN trade sanctions
These restrictions are based on international compliance, banking limitations, and fraud prevention policies.
If your country is eligible and you meet all the document and banking requirements, you can register and sell on Amazon marketplaces worldwide.
Which Amazon Marketplaces Can You Sell On?
You can sell on multiple Amazon marketplaces using one seller account, depending on your account type, country of registration, and regional eligibility. Amazon groups its marketplaces into regions with shared dashboards and listing tools.
Amazon Marketplace Regions
Amazon operates over 20 global marketplaces. These are grouped into major selling regions:
| Region | Marketplaces Available |
| North America | United States (amazon.com), Canada (amazon.ca), Mexico (amazon.com.mx) |
| Europe | United Kingdom, Germany, France, Italy, Spain, Netherlands, Poland, Sweden, Belgium |
| Asia-Pacific | Japan, Australia, Singapore |
| Middle East | United Arab Emirates, Saudi Arabia, Egypt |
| South America | Brazil |
| India | India (amazon.in) – operates separately |
Unified Amazon Accounts: What Does That Mean?
A Unified Account gives you access to multiple marketplaces in the same region.
You can switch between countries using a single login on Seller Central.
Examples:
- A North America Unified Account lets you sell in the US, Canada, and Mexico
- A Europe Unified Account gives access to the UK, DE, FR, IT, ES, NL, SE, PL, and BE
You can manage listings, inventory, orders, and pricing per marketplace from one dashboard.
Can You Sell in All Regions from One Account?
Not by default. Access to additional regions like Asia-Pacific or the Middle East may require:
- Additional tax registration (e.g., VAT in the UK, GST in Australia)
- Approval for cross-border selling
- Local banking setup for payouts
- Fulfillment support (either FBA Export or third-party logistics)
To expand, use the Amazon Global Selling program, which supports international growth and compliance.
Do You Need Separate Listings for Each Marketplace?
Yes, listings are marketplace-specific. Each country has:
- Its own language
- Currency
- Shipping settings
- Tax requirements
Fulfillment and Currency Considerations
| Factor | Key Requirements |
| Currency Support | Must accept payments in the marketplace’s currency |
| FBA Access | Available regionally, FBA Export enables some international sales |
| Shipping Rules | Must follow local shipping times and rates |
| Customer Service | Required in marketplace language (use Amazon support if using FBA) |
Marketplace Expansion Tips
- Start with your home region (e.g., US if you’re based in the United States)
- Enable FBA Export to reach international buyers automatically
- Consider regional tax and customs laws before listing products abroad
- Use Marketplace Switcher in Seller Central to manage multi-country listings
With the right setup, one Amazon account can give you access to over 20 marketplaces across five continents.
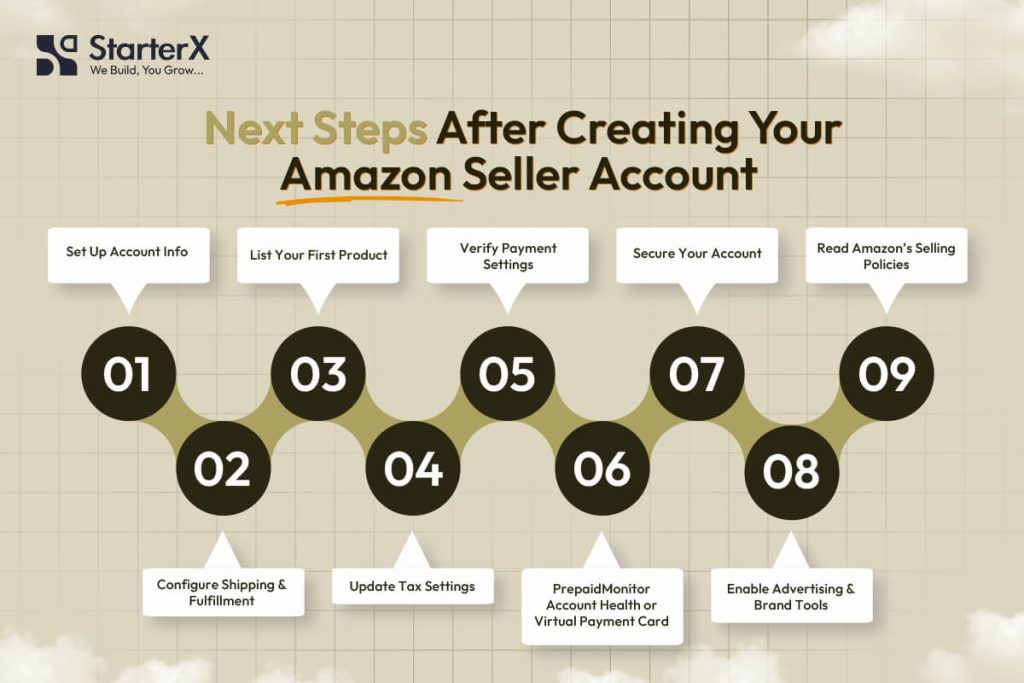
What Are the Next Steps After Creating Your Seller Account?
After your Amazon Seller account is verified, the next step is to properly set up your account so it is ready for real selling. This includes configuring your store details, choosing the right fulfillment method, preparing your first product listing, and making sure your account meets Amazon’s compliance standards.
You now have access to Seller Central, but how you set things up at this stage directly affects your performance, account health, and long-term growth.
1. Set Up Your Seller Account Information
Go to Settings → Account Info in Seller Central.
Before you start selling, make sure your account details are complete and accurate. This includes:
- Business display name that customers will see on your listings
- Business address that matches your verification documents
- Customer service email and phone number for buyer communication
- Storefront details if you plan to build a branded presence
Keeping this information consistent helps build trust and ensures your account stays compliant with marketplace requirements.
2. Configure Your Shipping and Fulfillment Method
Go to Settings → Shipping Settings and choose how you want to fulfill orders.
Your fulfillment method affects your costs, delivery speed, and overall business model. Many sellers compare different approaches before deciding how to handle storage, shipping, and customer service.
For Fulfilled by Merchant (FBM):
- Create shipping templates based on regions
- Set handling and delivery times
- Define shipping rates and return policies
For Fulfilled by Amazon (FBA):
- Enable FBA in your account
- Prepare products according to Amazon’s requirements
- Send inventory to Amazon fulfillment centers
Choosing between fulfillment options depends on how you want to manage operations, costs, and scalability, especially when comparing models like Amazon FBA and FBM for long-term growth.
3. Add and Optimize Your First Product Listing
Use Inventory → Add a Product to list your first item.
Before creating a listing, it’s important to focus on finding Amazon profitable products that already show consistent demand, stable pricing, and workable margins, especially if you are building a wholesale or scalable business.
If the product already exists in Amazon’s catalog, match the existing ASIN.
If it’s a new product, create a listing using:
- Product title (clear and keyword-focused)
- Bullet points that highlight key features
- High-quality images (at least 1000×1000 pixels)
- Product description and backend search terms
- Pricing, quantity, SKU, and product identifiers
A well-structured listing improves visibility, conversion rate, and overall performance from the start.
4. Configure Tax Settings Based on Your Region
Go to Settings → Tax Settings and update your tax profile.
Tax setup depends on where you are selling and where your business operates. While Amazon handles tax collection in many regions, sellers still need to stay compliant with local requirements.
- U.S. sellers must understand how marketplace tax collection works
- EU and UK sellers need to provide a valid VAT number
- Indian sellers must submit GST details
- Other regions may require local tax registration
Having a clear understanding of Amazon seller taxes helps you avoid reporting issues and ensures your account stays compliant as you grow.
5. Review and Confirm Your Payment Settings
Go to Settings → Deposit Methods and verify your bank account.
Make sure:
- The account supports currency payouts for your marketplace
- The name on the account matches your seller name or business registration
- The SWIFT/BIC and IBAN (for international sellers) are correct
Amazon disburses funds on a 14-day cycle, minus any applicable reserves or account holds.
6. Monitor Your Account Health from Day One
Amazon tracks performance using real-time metrics under Performance → Account Health.
Key performance attributes include:
| Metric | Threshold |
| Order Defect Rate (ODR) | Below 1% |
| Late Shipment Rate | Below 4% |
| Cancellation Rate | Below 2.5% |
| Tracking Validity | Over 95% |
Failing these thresholds can result in ASIN suppression or account suspension.
7. Enable Two-Step Verification and Seller Notifications
Secure your account with Two-Step Verification (2SV) under Login & Security.
Required options:
- Authenticator app or SMS verification
- Backup methods in case of device loss
Also, configure notification preferences to receive alerts for:
- Order updates
- Account warnings
- Customer inquiries
These settings ensure you never miss important operational or compliance-related events.
8. Activate Advertising Tools and Brand Protection Features
If you’re using a Professional account, you now have access to:
- Sponsored Products (Amazon PPC advertising)
- Coupons, promotions, and lightning deals
- Brand Registry (requires registered trademark)
- A+ Content and Storefront builder
If eligible, enroll your brand under Brand Registry via brandregistry.amazon.com
9. Read and Understand Selling Policies
Review Amazon’s official selling policies under Help → Policies and Agreements.
Focus on:
- Restricted product guidelines
- Condition guidelines (new, used, refurbished)
- Prohibited claims (e.g., health or safety-related claims)
- Customer communication policy (response times, tone, promotions)
Failure to follow these rules can lead to policy violations or account action.
By completing these steps, your account is fully ready to operate on Amazon. Focus on compliance, product quality, and performance from day one to avoid suspensions and build a healthy, scalable Amazon business.
Final Summary: Getting Started the Right Way on Amazon
Creating an Amazon Seller account is the first step to reaching millions of buyers. The process is straightforward when you prepare the right documents, follow Amazon’s verification requirements, and configure your account settings correctly.
Here’s a final checklist of what you’ve learned:
- Go to sell.amazon.com and register your account
- Choose the right seller plan: Individual or Professional
- Submit a valid ID, tax details, and a supported bank account
- Complete identity verification and wait for approval
- Set up Seller Central with shipping, tax, and listing configurations
- Create your first product listing and confirm the fulfillment method
- Monitor account health metrics and follow Amazon’s policies
- Enable security settings and explore advertising tools if eligible
Need help launching your store faster or getting expert guidance on your first listings?
StarterX helps new Amazon sellers with complete setup support, product listing optimization, and marketplace compliance, so you can avoid mistakes and start selling with confidence.
👉 Get Started with StarterX Now
FAQs About Setting Up an Amazon Seller Account
Can anyone open an Amazon Seller account?
You can open an Amazon Seller account if you live in an eligible country, have valid identification, a chargeable credit card, a bank account that supports payments, and meet Amazon’s verification requirements.
What documents are required to register as an Amazon seller?
You need a government-issued ID, a recent bank statement or utility bill, a valid credit card, and tax information such as a VAT number, SSN, EIN, or GST, depending on your location.
How long does it take to get verified on Amazon?
Amazon typically completes seller account verification within 24 to 72 hours, but it may take longer if documents are unclear, inconsistent, or incomplete.
What is the difference between an Individual and a Professional Amazon seller account?
Individual accounts have no monthly fee but charge $0.99 per sale, while Professional accounts cost $39.99/month and include tools like bulk listings, advertising, and Buy Box eligibility.
Can I upgrade from an Individual to a Professional seller account later?
Yes, you can upgrade at any time through your Seller Central dashboard without creating a new account.
Do I need a business license to sell on Amazon?
You don’t need a business license to sell as an Individual. Business accounts must submit proof of business registration, such as a certificate of incorporation or tax ID.
Which countries are eligible to register as Amazon sellers?
Amazon supports seller registrations from over 100 countries. Eligibility depends on your ability to complete identity verification and receive international payments.
Can I sell in multiple Amazon marketplaces with one account?
Yes, Amazon Unified Accounts let you sell in multiple countries within a region, such as North America or Europe, using one Seller Central login.
Do I need to list my products in each marketplace separately?
Yes, each Amazon marketplace requires its own product listing due to language, currency, tax, and fulfillment differences. You can use Amazon’s Build International Listings tool to copy and manage listings.
What happens after my seller account is approved?
After approval, you can access Seller Central, configure your store, add your first product, choose a fulfillment method, and begin managing orders and payments.
How do I avoid common Amazon registration errors?
Use matching legal names across all documents, upload high-resolution color scans, select the correct business type, use a chargeable credit card, and attend any required video verification appointments.
Is Fulfillment by Amazon (FBA) available to new sellers?
Yes, new sellers can use FBA after registration. You must prepare products according to FBA guidelines and ship inventory to Amazon’s fulfillment centers.
When will I receive my first Amazon payment?
Amazon disburses payments every 14 days. You’ll receive your first payout after your account is verified, products are sold, and reserve periods (if any) are met.
The StarterX Team is a group of e-commerce experts with years of hands-on experience in launching, managing, and scaling online businesses. As trusted authorities in the e-commerce space, we’ve helped entrepreneurs grow successful stores on Amazon, Shopify, TikTok, and Walmart. Backed by real-world results and a data-driven approach, we deliver proven strategies and insights you can trust to succeed in the digital marketplace.